Generate Let's Encrypt Cert For Your Domain Without Root Privileges
It was not too long ago when anyone wanting SSL/TLS for their domain would need to pay a cert authority (CA) for something which today we deem a necesity. This is one of the reasons I am a HUGE fan of Let’s Encrypt, which provides signed certificates for FREE.
Not only is it free, but its command line utility named Certbot allows super easy cert generation. If you do not have root access to your web host server however (i.e. shared hosting, using CPanel), things are a little trickier. The instructions below will hopefully help you in this task.
1. Install Let’s Encrypt’s Certbot on PC Where you Do Have Root Privs
At a high level, the task is simple; You lack the required privileges to generate a cert on your web host, so you will need to generate the cert on another computer (where you do have root privileges), and import the cert to your web host.
If you do not yet have Certbot installed on this second computer, please proceed with the installation. This step will depend on which version of Linux your other PC has installed. Luckily, the certbot site has excellent instructions on how to install depending on the OS. The site may be found here https://certbot.eff.org
2. Generate Certificate
From the computer where you’ve just installed Certbot, generate a certificate using manual mode using the command below.
sudo certbot --manual certonlyThe command will yield a series of question prompts. Simply read each question carefully and answer using the prompt.
3. Confirm Domain Ownership
One of the questions will require you to verify that you are the owner of the domain. It does so by generating a random token and asking you to place a file with said token in the //.well-known/acme-challenge/ directory.
-------------------------------------------------------------------------------
Create a file containing just this data:

ABCD1234...RandomRandomRandom...XYZ

And make it available on your web server at this URL:

http://www.<your domain>.com/.well-known/acme-challenge/<Some File Name>

-------------------------------------------------------------------------------
Press Enter to Continue
In my case, it asked me to do this twice. At this point I am not sure if it was due to some time limit I surpassed, or whether its standard to request two verifications.
4. Copy Generated Cert
After the domain ownership has been verified, your should see the following result.
IMPORTANT NOTES:
  - Congratulations! Your certificate and chain have been saved at:
    /etc/letsencrypt/live/www.<your domain>.com/fullchain.pem
    Your key file has been saved at:
    /etc/letsencrypt/live/www.<your domain>.com/privkey.pem
    Your cert will expire on <some date>. To obtain a new or tweaked
    version of this certificate in the future, simply run certbot
    again. To non-interactively renew *all* of your certificates, run
    "certbot renew"
  - If you like Certbot, please consider supporting our work by:

    Donating to ISRG / Let's Encrypt:   https://letsencrypt.org/donate
    Donating to EFF:                    https://eff.org/donate-le
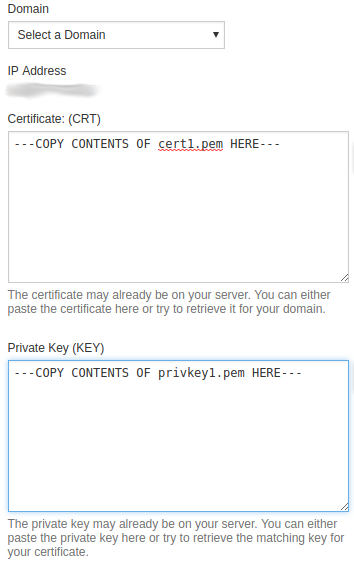
In the result above, please notice the location where the .pem files are placed. You will need the contents of the cert1.pem and privkey1.pem.
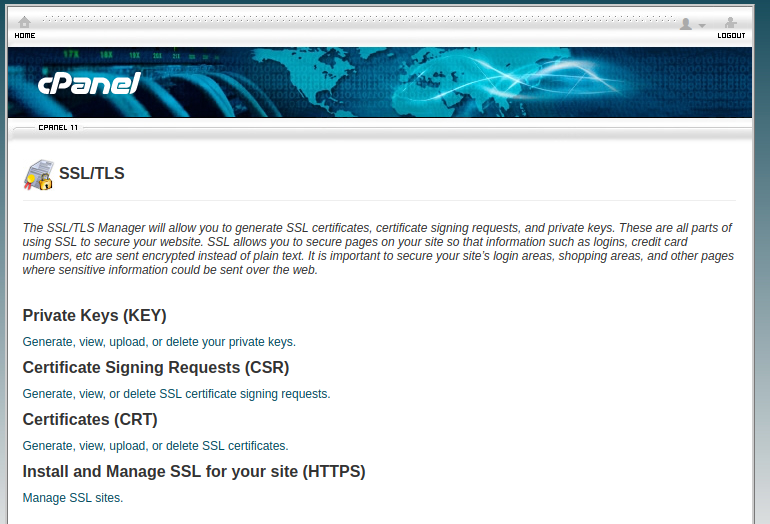
In this example, I am using a shared hosting provider wwhich includes CPanel. In CPanel, find “SSL/TLS” under the Security options:
 In SSL/TLS, select the “Install and Manage SSL for your site (HTTPS)” option:
 Once in that option, select your domain from the domain dropdown (show in the screenshot below), and copy the content of the .pem files as follows:
 Once complete, click on the “Install Certificate” to save and complete.
Bonus for those with Wordpress
If you are using the cert with Wordpress, and would like to default HTTPS over HTTP, login to your wp-admin panel, go to Settings -> General, and make sure you change the site URLs to ”https://blahblah…”, as shown below.
 Thats it. Took some elbow grease, but not too bad in my opinion. One thing to keep in mind is that certs do have an expiration date, so you will need to repeat these steps as needed.

