Java Connect to SQLite using Spring Boot
What You’ll Need
- Java JDK 8+ installed
- IDE (Eclipse, IntelliJ, etc)
What You’ll Get
A bare bones Spring Boot command line app which connects to a SQLite database using JDBCTemplate.
For the database, we’ll be creating a very simple table of beer names.
Create Spring Boot Project
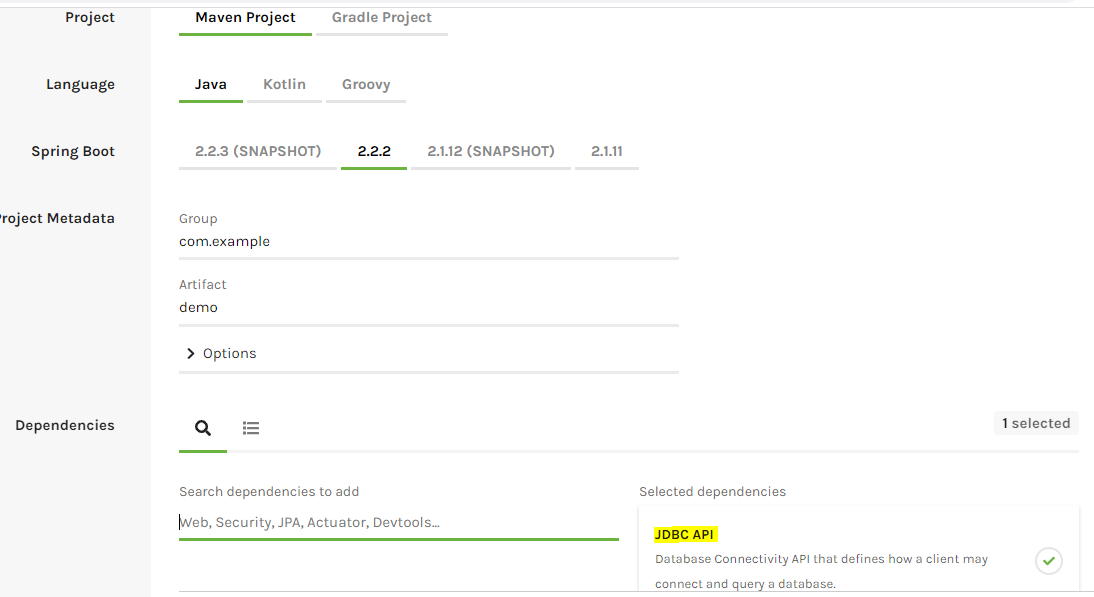
Go to start.spring.io to create the new project. Leave all the defaults and add “jdbc api” to the dependency list.

Import Maven Project to Your IDE
Unzip the generated file import it into your IDE as a Maven project. Once imported, add the following depedency into your pom.xml file for the sqlite jdbc driver:
<!-- https://mvnrepository.com/artifact/org.xerial/sqlite-jdbc -->
<dependency>
	<groupId>org.xerial</groupId>
	<artifactId>sqlite-jdbc</artifactId>
	<version>3.28.0</version>
</dependency>
Your final file will look similar to the below.
<?xml version="1.0" encoding="UTF-8"?>
<project xmlns="http://maven.apache.org/POM/4.0.0"
	xmlns:xsi="http://www.w3.org/2001/XMLSchema-instance"
	xsi:schemaLocation="http://maven.apache.org/POM/4.0.0 https://maven.apache.org/xsd/maven-4.0.0.xsd">
	<modelVersion>4.0.0</modelVersion>
	<parent>
		<groupId>org.springframework.boot</groupId>
		<artifactId>spring-boot-starter-parent</artifactId>
		<version>2.2.2.RELEASE</version>
		<relativePath /> <!-- lookup parent from repository -->
	</parent>
	<groupId>com.example</groupId>
	<artifactId>demo</artifactId>
	<version>0.0.1-SNAPSHOT</version>
	<name>demo</name>
	<description>Demo project for Spring Boot</description>

	<properties>
		<java.version>1.8</java.version>
	</properties>

	<dependencies>
		<dependency>
			<groupId>org.springframework.boot</groupId>
			<artifactId>spring-boot-starter-jdbc</artifactId>
		</dependency>

		<dependency>
			<groupId>org.springframework.boot</groupId>
			<artifactId>spring-boot-starter-test</artifactId>
			<scope>test</scope>
			<exclusions>
				<exclusion>
					<groupId>org.junit.vintage</groupId>
					<artifactId>junit-vintage-engine</artifactId>
				</exclusion>
			</exclusions>
		</dependency>
		<!-- https://mvnrepository.com/artifact/org.xerial/sqlite-jdbc -->
		<dependency>
			<groupId>org.xerial</groupId>
			<artifactId>sqlite-jdbc</artifactId>
			<version>3.28.0</version>
		</dependency>

	</dependencies>

	<build>
		<plugins>
			<plugin>
				<groupId>org.springframework.boot</groupId>
				<artifactId>spring-boot-maven-plugin</artifactId>
			</plugin>
		</plugins>
	</build>

</project>
Add Database URL
In your application.properties file (located in src/main/resources of your project), add the following like. This will create a new SQLite database file named “yourdatabasename_here.db” in the same directory as your Java project. Spring Boot will also use this to autowire your JDBCTemplate instance.
spring.datasource.url=jdbc:sqlite:your_database_name_here.dbCreate Entity Class
The bare-bones entity class below is used for mapping results of our query.
package com.example.demo;

public class Beer{
	private String name;
	public Beer(String name) {
		this.name = name;
	}
	public String getName() {
		return name;
	}
	public void setName(String name) {
		this.name = name;
	}
	@Override
	public String toString() {
		return "Beer [name=" + name + "]";
	}
}
Application Class
package com.example.demo;

import java.util.List;

import org.springframework.beans.factory.annotation.Autowired;
import org.springframework.boot.CommandLineRunner;
import org.springframework.boot.SpringApplication;
import org.springframework.boot.autoconfigure.SpringBootApplication;
import org.springframework.jdbc.core.JdbcTemplate;

@SpringBootApplication
public class DemoApplication implements CommandLineRunner {

	//Spring Boot will automagically wire this object using application.properties:
	@Autowired
	private JdbcTemplate jdbcTemplate;

	public static void main(String[] args) {
		SpringApplication.run(DemoApplication.class, args);
	}

	@Override
	public void run(String... args) throws Exception {
		//Create the database table:
		jdbcTemplate.execute("CREATE TABLE IF NOT EXISTS beers(name VARCHAR(100))");

		//Insert a record:
		jdbcTemplate.execute("INSERT INTO beers VALUES ('Stella')");

		//Read records:
		List<Beer> beers = jdbcTemplate.query("SELECT * FROM beers",
				(resultSet, rowNum) -> new Beer(resultSet.getString("name")));

		//Print read records:
		beers.forEach(System.out::println);
	}

}
Run
Execute the app and you should see the following print out in your IDE’s console:
Beer [name=Stella]
