My First Visual Studio Code Extension! - Spring Boot Snippets
Hey everyone and welcome back to Developer Soapbox. In this post, I’d like to share with you some details on how to install and use my new extension, which has some very useful snippets for Spring Boot projects.
Motivation
While Spring Boot is one of my favorite frameworks and has allowed me to be lazy by significantly reducing the amount of setup I have to do, there are still a couple of things which have always bothered me:
- Boilerplate code, especially for things like controllers and repositories.
- Having to google JDBC urls every time I need to set up a new database connection.
This extension tries to address that.
What You Need
This extension does require that you already have the following setup:
- JDK installed (1.8 or later)
- Visual Studio Code installed
While not required, I also recommend that you install the Spring Initializr extension from Microsoft, which can be found here. This will make project creation significantly easier. If you enjoy my content (which you know you do), I do have a video on how to use that extension here.
Installation
To install the extension, open your Visual Studio Code editor and click on the extensions panel. You can also access this panel with the shortcut Ctrl+Shift+X.
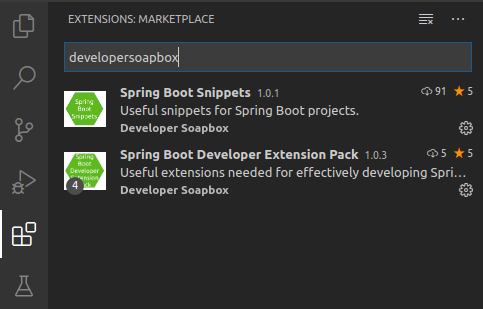
Once there, search for ‘developersoapbox’ and this will show you extensions created by yours trully. Select the extension labeled ‘Spring Boot Snippets’and click on the ‘Install’ button. Once installed, simply restart vscode.
Usage
Inside of your Spring Boot project, create a new Java file (.java file extension).
REST Controller
To add a controller, simply right-click on the file and start typing ‘spring-’ and hit ctrl+space for the snippet intellisense to kick in. Select the one labeled ‘spring-crudctrl’ and you now have a nice controller template with all major CRUD actions implemented. You can tab through the placeholder fields to change each of the values.
package packageName;

import java.util.ArrayList;
import java.util.List;
import java.util.Optional;

import org.springframework.beans.factory.annotation.Autowired;
import org.springframework.http.HttpStatus;
import org.springframework.http.ResponseEntity;
import org.springframework.web.bind.annotation.DeleteMapping;
import org.springframework.web.bind.annotation.GetMapping;
import org.springframework.web.bind.annotation.PathVariable;
import org.springframework.web.bind.annotation.PostMapping;
import org.springframework.web.bind.annotation.PutMapping;
import org.springframework.web.bind.annotation.RequestBody;
import org.springframework.web.bind.annotation.RequestMapping;
import org.springframework.web.bind.annotation.RestController;

@RestController
@RequestMapping("/resourceRootPath")
class resourceNameController {

    @Autowired
    repositoryClassName repository;

    @GetMapping
    public ResponseEntity<List<entityClassName>> getAll() {
        try {
            List<entityClassName> items = new ArrayList<entityClassName>();

            repository.findAll().forEach(items::add);

            if (items.isEmpty())
                return new ResponseEntity<>(HttpStatus.NO_CONTENT);

            return new ResponseEntity<>(items, HttpStatus.OK);
        } catch (Exception e) {
            return new ResponseEntity<>(null, HttpStatus.INTERNAL_SERVER_ERROR);
        }
    }

    @GetMapping("{id}")
    public ResponseEntity<entityClassName> getById(@PathVariable("id") entityIdType id) {
        Optional<entityClassName> existingItemOptional = repository.findById(id);

        if (existingItemOptional.isPresent()) {
            return new ResponseEntity<>(existingItemOptional.get(), HttpStatus.OK);
        } else {
            return new ResponseEntity<>(HttpStatus.NOT_FOUND);
        }
    }

    @PostMapping
    public ResponseEntity<entityClassName> create(@RequestBody entityClassName item) {
        try {
            entityClassName savedItem = repository.save(item);
            return new ResponseEntity<>(savedItem, HttpStatus.CREATED);
        } catch (Exception e) {
            return new ResponseEntity<>(null, HttpStatus.EXPECTATION_FAILED);
        }
    }

    @PutMapping("{id}")
    public ResponseEntity<entityClassName> update(@PathVariable("id") entityIdType id, @RequestBody entityClassName item) {
        Optional<entityClassName> existingItemOptional = repository.findById(id);
        if (existingItemOptional.isPresent()) {
            entityClassName existingItem = existingItemOptional.get();
            System.out.println("TODO for developer - update logic is unique to entity and must be implemented manually.");
            //existingItem.setSomeField(item.getSomeField());
            return new ResponseEntity<>(repository.save(existingItem), HttpStatus.OK);
        } else {
            return new ResponseEntity<>(HttpStatus.NOT_FOUND);
        }
    }

    @DeleteMapping("{id}")
    public ResponseEntity<HttpStatus> delete(@PathVariable("id") entityIdType id) {
        try {
            repository.deleteById(id);
            return new ResponseEntity<>(HttpStatus.NO_CONTENT);
        } catch (Exception e) {
            return new ResponseEntity<>(HttpStatus.EXPECTATION_FAILED);
        }
    }
}
REST Repository
The repository does not have as much reward as the controller, but will still save you from some typing. Simply start typing ‘spring-’ and hit ctrl+space for the snippet intellisense to kick in. Select the one labeled ‘spring-crudrepo’ and the result is a Spring Data repository, which in itself will handle all simple database repository code for you internally.
package packageName;

import org.springframework.data.repository.CrudRepository;
import org.springframework.data.rest.core.annotation.RepositoryRestResource;

//Remove @RepositoryRestResource below to disable auto REST api:
@RepositoryRestResource
public interface repositoryName extends CrudRepository<entityName, entityIdType>{}
Database Configuration Properties
Something I’ve always struggled with is remembering the url and property names for a specific database to add in my application.properties or application.yaml file. This meant a google search every time. If you have this same issue, fear not. My extension includes property snippets for all of the major databases (postgresql, mysql, oracle, h2, sqlite, sql server).
To use these, open your application.properties file (or application.yaml, which is also supported in the extension), start typing ‘spring-’ and hit ctrl+space for the snippet intellisense to kick in. Select the snippet for your particular database.
spring.datasource.url=jdbc:mysql://databaseHost:3306/databaseName
spring.datasource.username=username
spring.datasource.password=password
#spring.jpa.hibernate.ddl-auto=update
#spring.jpa.show-sql=true
Your screen now contains all the core necessary properties for the connection. Simply update any placeholders, like for your database name, and you’re all set.
Brand New Visual Studio Code Users
If you are brand new to using vscode for Java development, I’ve got another extension for you. This one is actually an extension pack, which is simply a package full of other useful extensions. It includes a good baseline to get you started and can be found by searching the extension panel in vscode for ‘developersoapbox’ and installing the extension labeled ‘Spring Boot Developer Extension Pack’.
Conclusion
I hope you find this extension useful. I had tons of fun learning about vscode extension development while building this, and will hopefully have more useful extensions for you soon.


