Super Easy REST API Creation with Rails 5
Without a doubt, my favorite feature of Ruby on Rails is scaffolding. With a single command, one can create the controller, model, and template for a resource. In this tutorial, you will create a simple API with only a few steps. This tutorial assumes that you have a successful Ruby on Rails 5 installation on your PC.
In the tradition of other tutorials I’ve created, this API will be used to manage a list of favorite beers.
1. Create Simple Project
Rails 5 includes the “—api” option which, obviously enough, informs Rails that your project should not need any views. To create a new API project in Rails, execute the following:
rails new beer_api --api
cd beer_api
2. Use Scaffold to Generate Resource
Because our project was created as an API, rails will create the controller and models only. No templates will be generated by scaffolding.
rails g scaffold Beer name:string abv:decimalTake a look at ./app/controllers/beers_controller.rb . You should see the code shown below. Notice that the generated controller looks different than its non-API counterpart. Specifically, methods only accept/return JSON.
class BeersController < ApplicationController
  before_action :set_beer, only: [:show, :update, :destroy]

  # GET /beers
  def index
    @beers = Beer.all

    render json: @beers
  end

  # GET /beers/1
  def show
    render json: @beer
  end

  # POST /beers
  def create
    @beer = Beer.new(beer_params)

    if @beer.save
      render json: @beer, status: :created, location: @beer
    else
      render json: @beer.errors, status: :unprocessable_entity
    end
  end

  # PATCH/PUT /beers/1
  def update
    if @beer.update(beer_params)
      render json: @beer
    else
      render json: @beer.errors, status: :unprocessable_entity
    end
  end

  # DELETE /beers/1
  def destroy
    @beer.destroy
  end

  private
    # Use callbacks to share common setup or constraints between actions.
    def set_beer
      @beer = Beer.find(params[:id])
    end

    # Only allow a trusted parameter "white list" through.
    def beer_params
      params.require(:beer).permit(:name, :abv)
    end
end
3. Seed Data and Migrate Changes to DB
Lets add some play data to the database. Simply add the following code to the ./db/seeds.rb file.
Beer.create(name: 'Jai Alai', abv: 7.5)
Beer.create(name: 'Stella Artois', abv: 5.0)
Beer.create(name: 'Lagunitas IPA', abv: 6.2)
Migrate and seed your changes by using the following two commands:
rails db:migrate
rails db:seed
4. Start Server
rails s5. Play Around with It
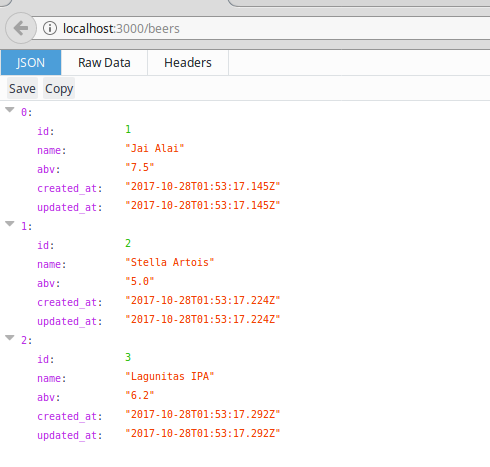
With the server started, you should be able to immediately do a GET on your resource by opening your web browser and going to http://localhost:3000/beers. You should see JSON for the records seeded.
 Now use a REST client to play around with POST and DELETE actions. In the examples below I am using CURL, which is often installed by default on Linux and MacOS systems.
We can DELETE the beer with ID 1 by using the following:
curl -X DELETE http://localhost:3000/beers/1Then POST a new beer by using the following:
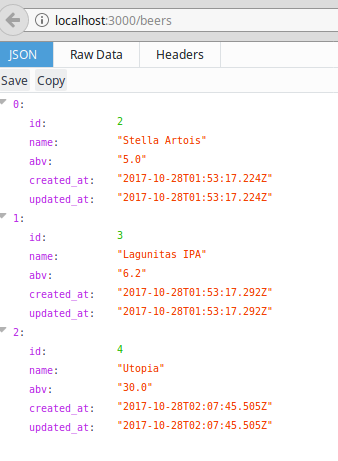
curl -X POST -H "Content-Type:application/json" -d '{ "name": "Utopia", "abv": "30.0" }' http://localhost:3000/beersBelow are our results after the DELETE and POST operations:

I hope you’ve enjoyed this tutorial. Although “lighter” frameworks such as Flask and Sinatra are becoming increasingly more popular, I still find Rails scaffolding a true gem when it comes to eliminating the redundant tasks needed for API creation.

